SerialPort and Sleep Mruby Gems To Instruct Texas LaunchPad TM4C123G with ARM Cortex M4
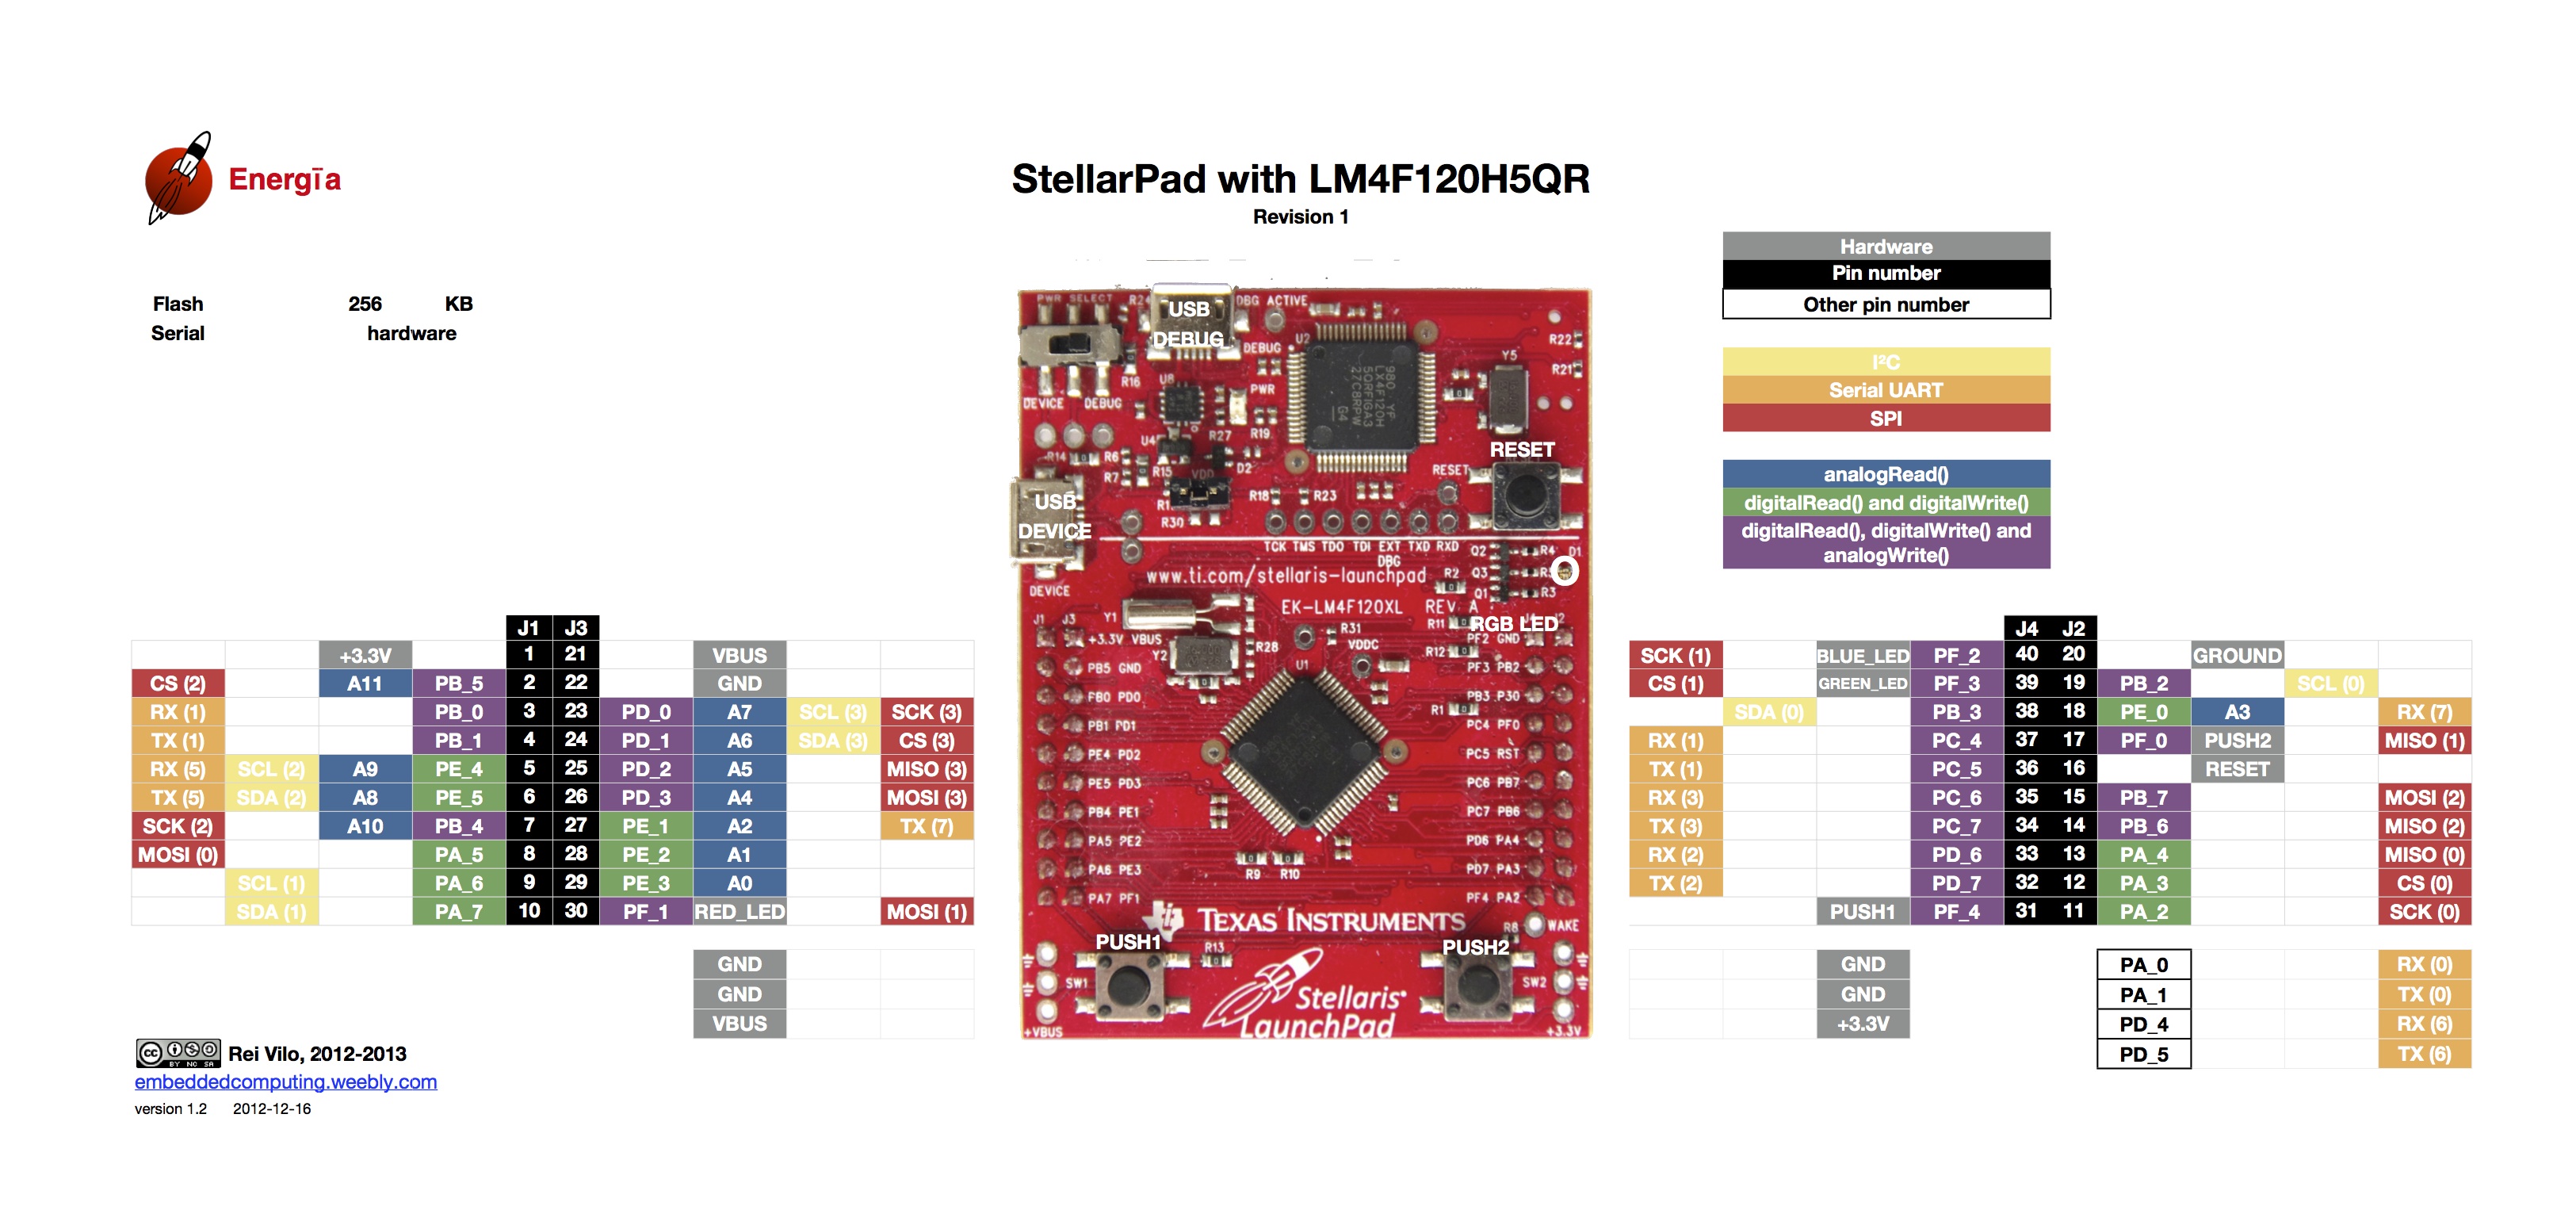
I always wanted to build something with mruby. After building mruby on my Raspberry Pi, I wanted to use the serialport mrbgem to instruct my Texas TM4C123G with ARM Cortex M4. I used to program the controller using Keil IDE on windows. After getting a mac, I have been writing program into it using energia. It is as simple as programming an arduino. The pin diagram with numbers are in the figure for the use in energia.

It has a built in led connected to the pins 1, 2, 3 and 4 of Port F (PF1, PF2, PF3, PF4). Each one contributes a single unique color to the led. So, when we give power to more than one of these pins, we get different colors. It’s fun working with these colors. So I have been using a serial communication program in the board so that it glows different leds with different combinations of PF1, PF2, PF3 and PF4.
The code is here.
void setup()
{
  // put your setup code here, to run once:
  Serial.begin(9600);


  pinMode(30, OUTPUT);
  pinMode(40, OUTPUT);
  pinMode(39, OUTPUT);
  pinMode(31, OUTPUT);
  digitalWrite(40, HIGH);
}

void got_char(char x) {

  //if we get l over Serial and so on
  if(x == 'l') {
    //... blink the LED
    digitalWrite(31,LOW);
    digitalWrite(40,HIGH);
    digitalWrite(39,LOW);
    digitalWrite(30,HIGH);
  }
  if(x == 'r'){
    digitalWrite(31,HIGH);
    digitalWrite(40,LOW);
    digitalWrite(39,HIGH);
    digitalWrite(30,LOW);

  }
  if(x == 'b'){
   digitalWrite(31,LOW);
    digitalWrite(40,HIGH);
    digitalWrite(39,HIGH);
    digitalWrite(30,LOW);
  }
  if(x == 'f'){
    digitalWrite(31,HIGH);
    digitalWrite(40,LOW);
    digitalWrite(39,LOW);
    digitalWrite(30,HIGH);
  }
  if(x == 's'){
    digitalWrite(31,LOW);
    digitalWrite(40,LOW);
    digitalWrite(39,LOW);
    digitalWrite(30,LOW);
  }
}
void loop()
{
  if(Serial.available() > 0) {
    //if there is, we read it
    byte byte_read = Serial.read();

    //and call "got_char"
    got_char((char)byte_read);
  }

}
After this, I went for mruby to play with the serialport mrbgem to instruct the controller. For this we have to install mruby first by following commands.
git clone http://github.com/mruby/mruby.git
cd mruby
make
Then we have to add the path variable to .bash_profile file in the home of Raspberry Pi. Just add the line at the end of .bash_profile file.
export PATH=$PATH:/home/pi/mruby/bin/
Then after restarting the terminal, we can have all the necessary command line tools for mruby as mirb, mruby, mrbc. Let’s install the serialport and sleep mrbgems. First of all we need to install mgem (command line utility for mrbgems).
gem install mgem
Now, we need to add mruby-serialport and mruby-sleep to the known mrbgems.
mgem add mruby-serialport
mgem add mruby-sleep
Then we need to generate our content of build_config.rb in the root folder.
mgem config
Right after this command, we need to give inputs to the required field and after that it will generate the content of build_config.rb. Then just create a file called build_config.rb and paste the content generated into it. Like my build_config.rb looks like this.
############################
# Start of your build_config

MRuby::Build.new do |conf|
  toolchain :gcc

  conf.bins = %w(mrbc)

  # mruby's Core GEMs
  conf.gem 'mrbgems/mruby-bin-mirb'
  conf.gem 'mrbgems/mruby-bin-mruby'
  conf.gem 'mrbgems/mruby-array-ext'
  conf.gem 'mrbgems/mruby-enum-ext'
  conf.gem 'mrbgems/mruby-eval'
  conf.gem 'mrbgems/mruby-exit'
  conf.gem 'mrbgems/mruby-fiber'
  conf.gem 'mrbgems/mruby-hash-ext'
  conf.gem 'mrbgems/mruby-math'
  conf.gem 'mrbgems/mruby-numeric-ext'
  conf.gem 'mrbgems/mruby-object-ext'
  conf.gem 'mrbgems/mruby-objectspace'
  conf.gem 'mrbgems/mruby-print'
  conf.gem 'mrbgems/mruby-proc-ext'
  conf.gem 'mrbgems/mruby-random'
  conf.gem 'mrbgems/mruby-range-ext'
  conf.gem 'mrbgems/mruby-sprintf'
  conf.gem 'mrbgems/mruby-string-ext'
#  conf.gem 'mrbgems/mruby-string-utf8'
  conf.gem 'mrbgems/mruby-struct'
  conf.gem 'mrbgems/mruby-symbol-ext'
  conf.gem 'mrbgems/mruby-time'
  conf.gem 'mrbgems/mruby-toplevel-ext'

  # user-defined GEMs
  conf.gem :git => 'https://github.com/monami-ya-mrb/mruby-serialport.git'
  conf.gem :git => 'https://github.com/matsumoto-r/mruby-sleep.git'
end

# End of your build_config
############################
I have commented the mruby-string-utf8 as it created some problems while installing. Then to build this in the directory, just hit rake.
rake
Then it will download the mebgems from git and will build it in the build directory. Before building, there are a few changes to be made in the mrbgems files. I found answers to my queries from the github repo of mruby-serialport. Just have a look here and set everything accordingly. After that use rake to build everyhting.
If it gets successful, we can write program (serialport.rb) to instruct our controller.
From a Ruby File
 sp = SerialPort.new("/dev/ttyUSB0", 9600, 8, 1, 0)
 sp.read_timeout=1000


list = ['f', 'b', 'r', 'l', 's']
loop do
   list.each do |l|
     sp.write(l)
     Sleep::sleep(2)
   end
end
Provided you own the serialport file ttyUSB0 for the controller. Otherwise, do this.
sudo chown pi /dev/ttyUSB0
I am sending the characters from the list because I have programmed my board to receive these characters to glow certain leds. The Sleep::sleep(2) adds a delay of 2 seconds between consecutive writes of characters. To run this use the following.
mruby serialport.rb
And enjoy different colors glowing on the same led with a halt of 2 seconds.
From an Executable made using a C file
Then I wanted to run it with an executable built using the tool mrbc.
mrbc -Bserialport serialport.rb
It will create a file called serialport.c with an array called serialport[]. Just add the following at the end o f the serialport.c file.
#include "mruby.h"
#include "mruby/irep.h"
#include "mruby/proc.h"


int main(void) {

	mrb_state *mrb;
	mrb = mrb_open();

	mrb_load_irep(mrb, serialport);

	mrb_close(mrb);

	return 0;
}
After this run the following commands to make an executable.
gcc -I/home/pi/mruby/src -I/home/pi/mruby/include -c serialport.c -o serialport.o
gcc -o serialport serialport.o -lm /home/pi/mruby/build/host/lib/libmruby.a
The above command creates an executable serialport. Just run it and it will do the same that the ruby code was doing before.
Happy Hacking. :)
P.S. - make sure the baud_rate from both the sides are same. :P